How to crop rotated images using bounding box points of image?
IC13 데이터셋의 텍스트이미지를 EasyOCR로 BBOX를 추출해내는 과정 중에서, 에러가 발생했다.
하나의 이미지에 대해서만 발생한 예외상황으로 BBOX 좌표값을 추출한 뒤, cropped image를 생성하는 과정에서 이 발생하였다.

원인은 이미지에 보이는 "UPGRADE" 단어처럼 대각선으로 기울어진 텍스트들은 BBOX의 좌표값이 start 좌표값이 end 좌표값보다 커지기 때문에 기존의 코드가 적용되지 않고, 에러가 발생했던 것이다.
image[start_Y:end_Y, start_X:end_X]따라서, crop하는 과정에서 기울어진 텍스트 이미지까지 추출해서 가져올 수 있는 코드가 필요했다.
차근히 한번 만들어보자.
우선, EasyOCR에 이미지를 넣으면 이러한 결과값이 나온다.
reader = easyocr.Reader(['en'])
result = reader.readtext(image)
print("EasyOCR : Results of the image")
print(result)
# Output
EasyOCR : complete to read text of image
[([[360, 92], [504, 92], [504, 124], [360, 124]], 'SAMSUNG', 0.9967417540953831), ([[372, 240], [490, 240], [490, 264], [372, 264]], "DIGITAL LIFE'", 0.7062438359667068), ([[110, 306], [252, 306], [252, 336], [110, 336]], 'POCKET FLASH', 0.6041529863513503), ([[317.6546544120074, 248.52011985320812], [370.70839711122886, 240.9601061062085], [373.3453455879926, 262.4798801467919], [321.29160288877114, 271.0398938937915]], 'YOUR', 0.9987368583679199), ([[239.84615384615384, 289.2307692307692], [314.0334084442178, 245.7942688062722], [325.15384615384613, 270.7692307692308], [250.9665915557822, 314.2057311937278]], 'UPGRADE', 0.9966377525627594)]boxes = result[-1][0]
print(boxes) # [[239.84615384615384, 289.2307692307692], [314.0334084442178, 245.7942688062722], [325.15384615384613, 270.7692307692308], [250.9665915557822, 314.2057311937278]]
point_1 = [[int(boxes[0][0]), int(boxes[0][1])]]
point_2 = [[int(boxes[1][0]), int(boxes[1][1])]]
point_3 = [[int(boxes[2][0]), int(boxes[2][1])]]
point_4 = [[int(boxes[3][0]), int(boxes[3][1])]]
# print(f"left-top : {point_1}")
# print(f"right-top : {point_2}")
# print(f"right-bottom : {point_3}")
# print(f"left-bottom : {point_4}")
from itertools import chain
cnt = np.array(list(chain(point_1, point_2, point_3, point_4)))
print("shape of cnt: {}".format(cnt.shape)) # shape of cnt: (4, 2)
cnt
""" array([[239, 289],
[314, 245],
[325, 270],
[250, 314]])"""이제, 본격적으로 기울어진 BBOX를 추출해보자. (OpenCV 활용)
여러 방법을 찾아보다가 해당 글을 발견했다.
https://jdhao.github.io/2019/02/23/crop_rotated_rectangle_opencv/
Cropping Rotated Rectangles from Image with OpenCV
In computer vision tasks, we need to crop a rotated rectangle from the original image sometimes, for example, to crop a rotated text box. In this post, I would like to introduce how to do this in OpenCV.
jdhao.github.io
요약하면, 이러하다.
1. minAreaRect(cnt)를 통해서 좌표값에 해당하는 사각형의 정보를 뽑아 낸다.
rect = list(cv2.minAreaRect(cnt))
print("rect: {}".format(rect))
# Output
shape of cnt: (4, 2)
rect: [(282.0000305175781, 279.5000305175781), (27.129283905029297, 90.11660766601562), 59.60126876831055]
* RotatedRect()의 매개변수 값들이 minAreaRect의 리턴값이라고 생각해도 무방하다.
* points를 모서리로 가진 사각형의 [(중앙점X, 중앙점Y), (너비, 높이), 각도]

2. 위에서 구한 사각형 정보를 통해, 사각형의 bbox point를 다시 뽑아낸다.
- 기존의 [right-top, right-bottom, left-bottom, left-top] 순서에서 [left-top, right-top, right-bottom, left-bottom] 로 변경됨
box = cv2.boxPoints(rect)
# print(box)
box = np.int0(box)
print("bounding box: {}".format(box))

img = image.copy()
tools.display(cv2.drawContours(img, [box], 0, (0, 0, 255), 2))
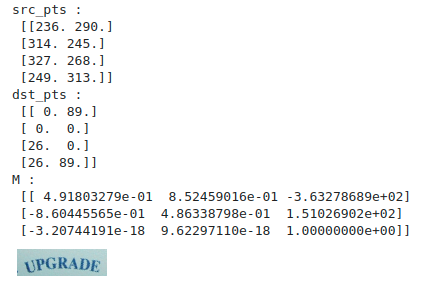
3. 원래의 이미지에서 BBOX부분을 원근 변환(perspective transform) 시켜준다.
# 검출된 bbox 사각형의 너비와 높이
width = int(rect[1][0])
height = int(rect[1][1])

# 검출된 bbox 사각형의 좌표값
src_pts = box.astype("float32")
print(f"src_pts :\n {src_pts}")

# 검출된 bbox 사각형의 거리 벡터
dst_pts = np.array([[0, height-1],
                    [0, 0],
                    [width-1, 0],
                    [width-1, height-1]], dtype="float32")
print(f"dst_pts :\n {dst_pts}")

# 원근변환을 위한 행렬 구하기
M = cv2.getPerspectiveTransform(src_pts, dst_pts)
print(f"M :\n {M}")

# 원근변환 적용한 이미지 리턴받기
img = image.copy()
warped = cv2.warpPerspective(img, M, (width, height))
tools.display(cv2.rotate(warped, cv2.ROTATE_90_CLOCKWISE))
# 60도쯤 되는
* cv2.getPerspectiveTransform (return : 3x3 matrix)
---> 원래의 좌표값(source points : src_pts)과 width, height 거리 좌표값(distance points : dst_pts)을 활용하여 원근 변환을 위한 행렬을 계산해준다.
---> 입력 좌표값이 2차원 벡터이기 때문에 3x3 행렬을 계산해주지만, 3차원 벡터를 넣는 경우는 4x4 행렬이 리턴된다.

* cv2.warpPerspective (return : array)
--> 원본 이미지에 아래의 이미지처럼 행렬값을 곱해주어 원근 변환된 이미지 array를 리턴한다.

끝!
'Programming > python-computer vision' 카테고리의 다른 글
| Matplotlib Colormaps로 OpenCV Contours 그리는 법 (0) | 2023.07.19 |
|---|---|
| Color Space (색공간), OpenCV (1) | 2023.07.13 |
| 바운딩 박스 텍스트 읽는 순서대로 정렬하는 법 | How to sort the shuffled bounding boxes in a same way to read text (0) | 2023.02.06 |
| (OpenCV, Matplotlib) 파이썬에서 이미지 시각화하는 방법, 띄우는 방법 (0) | 2023.01.02 |
| 이미지 회전 Image Rotation할 때, 이미지 잘리지 않게 하는 법 | imutils.rotate(), rotate_bound() (0) | 2022.12.26 |